Phihong Configuration
Config Utility Access

Setup process for connecting the hardware config utility via a local laptop (from the Phihong user manual)
In order to configure the chargestation hardware settings, you need the following:
A laptop
- With a web browser e.g. Chrome
- Configurable IP address
- We recommend a Windows based laptop for this step rather than a Mac
Ethernet cable
To connect directly to the chargestation
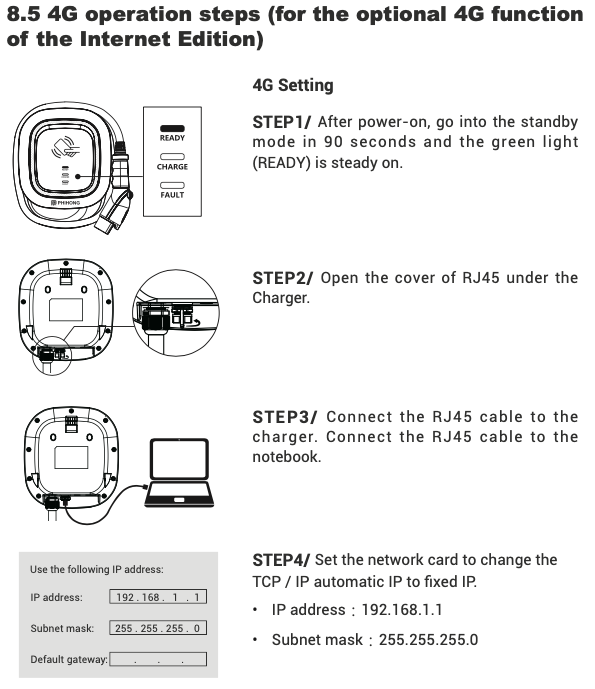
Please follow steps 1-4 as shown in the image from the Phihong manual above
- Step 1: Power on and wait for a green LED light
- Step 2: Expose the RJ45 Ethernet on the chargestation
- Step 3: Connect an ethernet cable between the chargestation and your laptop
- Step 4: Set your laptop IP address to 192.168.1.1
NOTE: Step 4 (Setting a Fixed IP on your laptop)
Please see how to set a fixed IP on your Windows laptop here: Change TCP/IP Settings
Final Step: Access the Web Config Utility
Navigate your web browser to 192.168.1.10
If your browser complains about privacy / unsafe site, please click advanced and proceed anyway.
Username and Password
The chargestation configuration is protected by a username and password. Please contact the eDRV team for access.
eDRV Server Connection
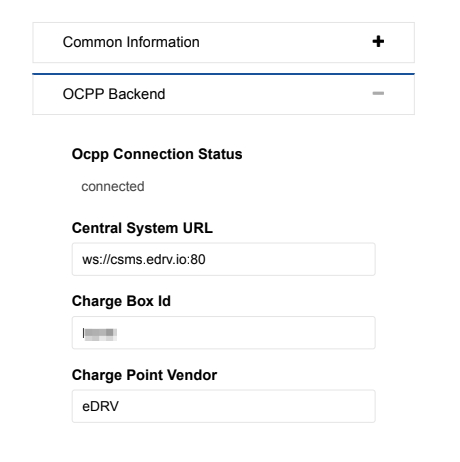
Once you have accessed the browser based config utility, please navigate to Set > OCPP Backend

Image from Phihong's web based charge station connection utility.
Central System URL
This is the URL of the eDRV server
ws://csms.edrv.io:80
Charge Box Id
This is the Endpoint from the eDRV admin dashboard.
4 digit Endpoint Id from the eDRV admin dashboard. See Chargestation Connection
4G SIM Setup
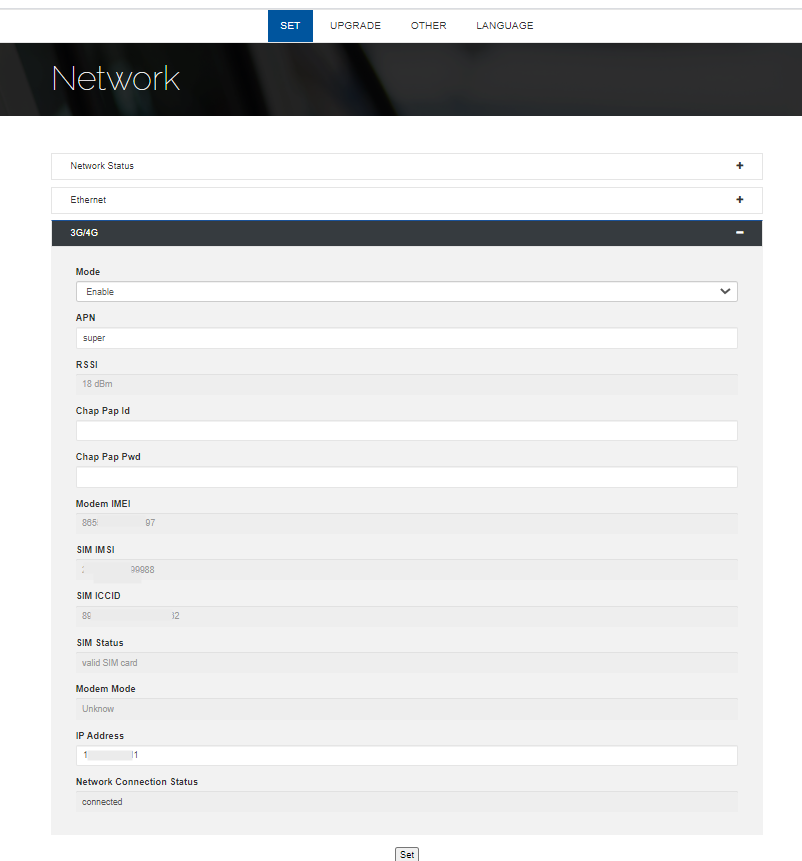
Once you have accessed the browser based config utility, please navigate to Set > Network > 3G/4G

After you have installed the SIM you can configure it as follows:
Step 1: Mode
To enable/disable 4G comms
Enable
Step 2: APN
The Access Point Name of the SIM/Data provider. Case sensitive!
Twilio SIMs: super
Step 3: Restart the Chargestation
4G Connection Status Fields
Once the CS is up and running you can see the current data comms status:
RSSI
Displays the current mobile network Received Signal Strength in dBm. The higher the better.
The lowest we have seen in testing is 15dBm.
Step 2: Network Connection Status
Status of the mobile data connection from the Chargestation to the mobile network provider. >Connected/Disconnected
Updated almost 2 years ago
